Crown Molding

Have you installed, or tried to install crown molding but just couldn't get the corners to meet up correctly? Or did you get it right, but it took a lot of time and wasted material? If so, this Crown Molding calculator app is for you!
For Do-It-Yourselfers and Professionals alike, this Crown Molding app calculates the miter and bevel angles to use with a miter saw when cutting crown molding for installation.
Crown Molding supports both horizontal corners (for typical flat ceilings and mantels, etc) and vertical corners as required for cathedral or vaulted ceilings.
Easy-to-understand illustrations are displayed to assist with placing the piece of crown molding on the saw for the perfect cut.
No more guessing or wasted material. Cut it right the first time!
Introduction
The following are images of the main screen for the app. The screens are similar for all of the devices with only minor differences between them.
Selecting the Help button in the lower-right corner will provide a display of the available help information.
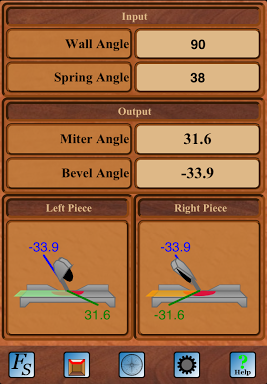
Input
The application takes two values as input: the wall angle and the spring angle. These inputs can be found under the Input heading in the top-left portion of the screen.

Wall Angle
The wall angle is the angle between the two walls at the corner. The wall angle is measured in degrees. A value of 90° represents an inside square corner (e.g., a corner in a rectangular room.) A value of 270° represents an outside corner (e.g., around the outside of a shelving unit.)

Spring Angle
The spring angle is the angle at which the crown molding comes off the wall. Most crown molding uses one of two varieties: 45/45 and 38/52. For these varieties, the spring angle would be 45 and 38, respectively.

Output
Given the wall and spring angles, this application will calculate the miter and bevel angles used to cut the crown molding so that two pieces will come together to achieve the wall angle at the given spring angle. These outputs can be found under the Output heading of the display.
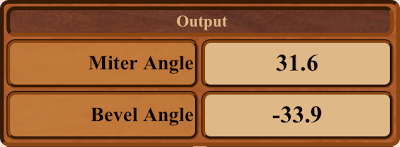
Miter Angle
The Miter Angle is the miter angle to use on the saw when cutting the piece of crown molding for the left side of the corner. A negative angle specifies a miter angle on the left side of center. A positive angle specifies a miter angle on the right side of center.
The background color of the miter angle output will change to red if the calculated value exceeds the maximum miter angle value set in the preferences. See the Preferences section below.

Bevel Angle
The Bevel Angle is the bevel angle to use on the saw when cutting the piece of crown molding for the left side of the corner. A negative angle specifies a bevel angle on the left side of center. A positive angle specifies a bevel angle on the right side of center.

Note that regular compound miter saws are not able to be set for positive bevel angles but dual compound miter saws can. For regular compound miter saws, the cutting illustrations (see below) will assist you in properly placing the crown molding so that positive bevel angle cuts are not required.
The background color of the bevel angle output will change to red if the calculated value exceeds a maximum of 45°.
Cutting Illustrations
The cutting illustrations assist you with the setup of the miter saw and with the placement of the piece of crown molding. The crown molding is laid flat on the table of the miter saw with the top edge of the crown molding placed against the fence.
The Left Piece illustration shows the configuration and placement for cutting the piece of crown molding that will be used for the left side of the corner. Similarly, the Right Piece illustration is for the piece to be used for the right side of the corner.
See below for a sample of one of the cutting illustrations. The illustration shows the table and fence of the miter saw as well as the arm, saw blade and shield.
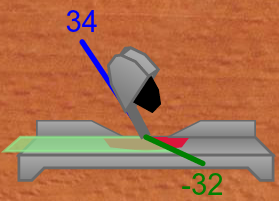
The solid green line indicates how to set the miter position of the saw. Use this line to confirm that you have the miter saw set to the correct miter position.
The solid blue line indicates how to set the bevel position of the saw. Use this line to confirm that you have the miter saw set on the correct bevel position.
The large light green colored shape represents the piece of crown molding being cut and shows which side of the saw blade the piece to be used will be. The piece on the other side of the blade is the discard piece.
If you do not have a dual compound miter saw, you may be presented with illustrations with an orange shape for the crown molding piece instead of a light green piece as shown below.
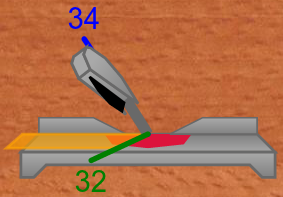
Since regular compound miter saws cannot be set to a bevel angle on the right side of center, the saw must be used with bevel angle position to the left. This may result in an alternate placement of the piece of crown molding. The orange colored piece indicates that the top edge of the crown molding will be away from the fence (closer to you) instead of against the fence.
 Cathedral or Vaulted Ceilings
Crown Molding also allows you to calculate the cutting angles for cathedral or vaulted ceilings.
When in vaulted ceiling mode, the input section of the display will change to look similar to the following:

Ceiling Angle
The ceiling angle is the angle of change in the ceiling along the current wall.
The ceiling angle is measured in degrees. A value of 90° represents an inside square corner. A value of 270° represents an outside square corner. A value of 180° represents a straight line.


Note that the ceiling angle must taken relative to a single straight wall.
If a change in wall angle occurs at the same time, you must first bring the crown around the wall corner (ie. 90° wall angle cut) to get the crown onto the wall with the vaulted ceiling. The piece used to wrap around the corner can be cut to effectively be zero length by making the top of ceiling angle cut line up with the top of the wall angle cut.
From here, the ceiling angle will be relative to the angle of the crown (ie horizontal and not vertical). For example, given a 20° rise for the ceiling, the angle to use for the ceiling angle would be 200°. With the crown starting hoizontally, the corner is effectively an outside corner. So the angle will be 180° plus the 20° rise.
The Spring Angle is the same as for regular mode.
 Switching Modes
There are two methods to switch the app between the regular and vaulted ceiling modes.
The first method is to tap on the second icon from the left at the bottom of the screen. When tapped, this icon will change and will always display the current mode of the app. One of the following icons will be displayed:
![]() Regular Mode
Regular Mode
![]() Vaulted / Cathedral Ceiling Mode
Vaulted / Cathedral Ceiling Mode
When switching modes using this method, the app internally maintains different copies of the wall and ceiling angles. What this means is that when you switch back to the other mode, the last angle that you had entered in that mode will be displayed again.
The second method is to tap on the Wall Angle or Ceiling Angle label in the input section of the display.
When switching modes using this method, the app maintains the currently displayed angle and uses it in the new mode.
 Preferences
The preferences allow for customization of the application to match you and your miter saw. The preferences can be found by tapping on the Preferences button that looks like a gear.
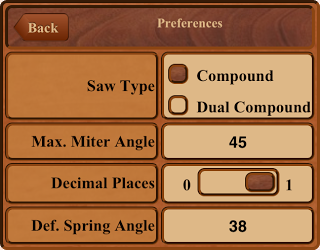
Saw Type
The Saw Type setting allows for customization of the application to match the type of compound miter saw being used. The available settings are Compound Miter Saw and Dual Compound Miter Saw. A Compound Miter Saw allows for bevel cuts from one side only (typically -45° to 0°) whereas a Dual Compound Miter Saw allows for bevel cuts from both sides (typcially -45° to 45°).
Maximum Miter Angle
The Maximum Miter Angle setting allows for customization of the maximum miter angle supported by your saw. Typically this will be 45 but could also be 52. If a calculated miter angle exceeds this value, the miter angle is displayed in red.
Decimal Places
The Decimal Places setting allows for customization of the number of decimal places displayed for the miter and bevel angles. The setting allows for zero or one digits.
Default Spring Angle
The Default Spring Angle setting allows for customization of the default value to use for the spring angle when the application starts.
Allow Anonymous Analytics
The Allow Anonymous Analytics setting provides control over the anonymous tracking of user analytics. If set, the application will anonymously track and report, via a third-party analytics service, on some of the interactions you have with this application. No user identifiable information is collected. This information is collected to assist Fisherlea Systems in understanding how users use this application with a goal of improving the user experience.
 Protractor
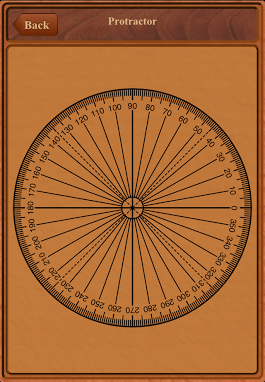
Tapping on the protractor button will display an image of a protractor. This protractor can be used to measure angles by fitting an angle tool to the angle to be measured and then laying the angle tool on top of the protractor to determine the angle.
The protractor can be switched between a 360° and a 180° protractor by tapping on the protractor icon near the top right of the screen:
![]() Switch to 180° protractor.
Switch to 180° protractor.
![]() Switch to 360° protractor.
Switch to 360° protractor.
Be careful not to scratch the screen of your device when using this protractor tool to take measurements.